

Microsoft Excel adalah lembar kerja elektronik. Anda dapatmenggunakannya untuk mengatur data ke dalam baris dan kolom.Anda juga dapat menggunakannya untuk melakukan perhitunganmatematis dengan cepat. Tutorial ini mengajarkan dasar-dasar Microsoft Excel. Meskipun pengetahuan tentang cara menavigasidalam lingkungan Windows yang bermanfaat, tutorial ini diciptakan untuk pemula komputer.
Pelajaran ini akan memperkenalkan Anda ke jendela Excel. Anda menggunakan jendela untuk berinteraksi dengan Excel. Untuk memulai pelajaran ini, mulai Microsoft Excel 2007. JendelaMicrosoft Excel muncul dan layar Anda terlihat mirip dengan salah satu yang ditampilkan di sini


Next to the Quick Access toolbar is the Title bar. On the Title bar, Microsoft Excel displays the name of the workbook you are currently using. At the top of the Excel window, you should see "Microsoft Excel - Book1" or a similar name.


Formula Bar
1. Pilih tab View.
2. Klik Formula Bar di kelompok Tampilkan /Sembunyikan. Formula bar muncul.
Catatan: saat ini menampilkan alamat sel di sisikiri Formula bar.


 If you wish to perform a function on a group of cells, you must first select those cells by highlighting them. The exercises that follow teach you how to select.


sumber http://www.baycongroup.com/excel2007/01_excel.htm
Pelajaran ini akan memperkenalkan Anda ke jendela Excel. Anda menggunakan jendela untuk berinteraksi dengan Excel. Untuk memulai pelajaran ini, mulai Microsoft Excel 2007. JendelaMicrosoft Excel muncul dan layar Anda terlihat mirip dengan salah satu yang ditampilkan di sini
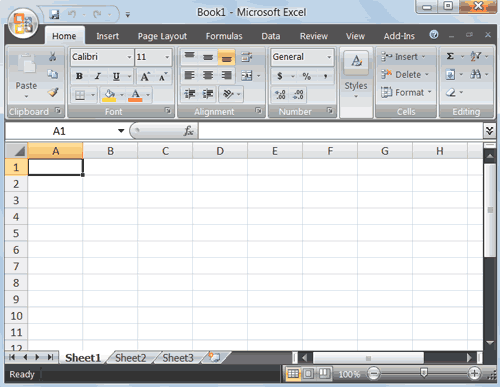
Catatan: Layar Anda mungkin tidak akan tampak persis seperti layar yang ditunjukkan. Dalam Excel2007, bagaimana menampilkan jendela tergantungpada ukuran jendela Anda, ukuran monitor anda,dan resolusi monitor anda yang diatur. Resolusi menentukan berapa banyak informasi monitor komputer Anda dapat menampilkan. Jika Anda menggunakan resolusi rendah, kurang informasisesuai pada layar Anda, tetapi ukuran teks dangambar yang lebih besar. Jika Anda menggunakanresolusi tinggi, informasi lebih sesuai pada layarAnda, tetapi ukuran teks dan gambar yang lebih kecil. Juga, pengaturan dalam Excel 2007,Windows Vista, dan Windows XP memungkinkan Anda untuk mengubah warna dan gaya dari jendela Anda.
Tombol Microsoft Office :
Tombol Microsoft Office :

Di sudut kiri atas jendela Excel 2007 adalah tombolMicrosoft Office. Ketika Anda mengklik tombol,muncul menu. Anda dapat menggunakan menu untuk membuat file baru, buka file yang sudah ada,menyimpan file, dan melakukan tugas-tugaslainnya.
The Quick Access Toolbar
Sebelah tombol Microsoft Office adalah toolbarQuick Access. Quick Access toolbar memberikanAnda akses ke perintah Anda sering gunakan.Secara default, Simpan, Undo, dan Redo tampil pada Quick Access toolbar. Anda dapatmenggunakan Save untuk menyimpan file Anda,Undo untuk memutar kembali tindakan yang telah diambil, dan Redo mengajukan permohonan kembali tindakan Anda telah bergulir kembali.
The Title Bar
The Ribbon

Anda menggunakan perintah untuk memberitahuMicrosoft Excel apa yang harus dilakukan. Dalam Microsoft Excel 2007, Anda menggunakan Ribbon untuk mengeluarkan perintah. Ribbon terletak di dekat bagian atas jendela Excel, di bawah Quick Access toolbar. Di bagian atas Ribbon beberapa tab, klik tab menampilkan beberapa perintah terkait kelompok. Dalam setiap kelompok terkait tombol perintah. Anda klik tombol untuk mengeluarkan perintah atau untuk mengakses menu dan kotak dialog. Anda juga dapat menemukan kotak dialog peluncur ( tanda panah kecil) di sudut kanan bawah dari suatu kelompok. Ketika Anda mengklik peluncur kotak dialog, kotak dialog membuat perintah tambahan yang tersedia.( tanda panah kecil)
Worksheets
Microsoft Excel terdiri dari lembar kerja. Setiaplembar berisi kolom dan baris. Kolom yangberhuruf A sampai Z dan kemudian melanjutkandengan AA, AB, AC dan sebagainya, sedangkanbaris diberi nomor 1 sampai 1.048.576. Jumlahkolom dan baris Anda dapat memiliki dalamworksheet dibatasi oleh memori komputer Andadan sumber daya sistem Anda.
Kombinasi dari kolom dan baris koordinatkoordinat membentuk sebuah alamat sel. Sebagai contoh, sel yang terletak di sudut kiri atasworksheet adalah sel A1, yang berarti kolom A, baris 1. Sel E10 terletak di bawah kolom E pada baris 10. Anda memasukkan data Anda ke dalam sel pada lembar kerja.The Formula Bar
Formula Bar
Jika Formula bar dihidupkan, alamat sel dari selAnda berada dalam menampilkan di kotak Namayang terletak di sisi kiri Formula bar. Entri selditampilkan pada sisi kanan Formula bar. JikaAnda tidak melihat Formula bar di jendela Anda, lakukan langkah-langkah berikut:
2. Klik Formula Bar di kelompok Tampilkan /Sembunyikan. Formula bar muncul.
Catatan: saat ini menampilkan alamat sel di sisikiri Formula bar.
The Status Bar
The Status bar appears at the very bottom of the Excel window and provides such information as the sum, average, minimum, and maximum value of selected numbers. You can change what displays on the Status bar by right-clicking on the Status bar and selecting the options you want from the Customize Status Bar menu. You click a menu item to select it. You click it again to deselect it. A check mark next to an item means the item is selected.
Move Around a Worksheet
By using the arrow keys, you can move around your worksheet. You can use the down arrow key to move downward one cell at a time. You can use the up arrow key to move upward one cell at a time. You can use the Tab key to move across the page to the right, one cell at a time. You can hold down the Shift key and then press the Tab key to move to the left, one cell at a time. You can use the right and left arrow keys to move right or left one cell at a time. The Page Up and Page Down keys move up and down one page at a time. If you hold down the Ctrl key and then press the Home key, you move to the beginning of the worksheet.EXERCISE 1
Move Around the Worksheet
The Down Arrow Key
- Press the down arrow key several times. Note that the cursor moves downward one cell at a time.
The Up Arrow Key
- Press the up arrow key several times. Note that the cursor moves upward one cell at a time.
The Tab Key
- Move to cell A1.
- Press the Tab key several times. Note that the cursor moves to the right one cell at a time.
The Shift+Tab Keys
- Hold down the Shift key and then press Tab. Note that the cursor moves to the left one cell at a time.
The Right and Left Arrow Keys
- Press the right arrow key several times. Note that the cursor moves to the right.
- Press the left arrow key several times. Note that the cursor moves to the left.
Page Up and Page Down
- Press the Page Down key. Note that the cursor moves down one page.
- Press the Page Up key. Note that the cursor moves up one page.
The Ctrl-Home Key
- Move the cursor to column J.
- Stay in column J and move the cursor to row 20.
- Hold down the Ctrl key while you press the Home key. Excel moves to cell A1.
Go To Cells Quickly
The following are shortcuts for moving quickly from one cell in a worksheet to a cell in a different part of the worksheet.EXERCISE 2
Go to -- F5
The F5 function key is the "Go To" key. If you press the F5 key, you are prompted for the cell to which you wish to go. Enter the cell address, and the cursor jumps to that cell.- Press F5. The Go To dialog box opens.
- Type J3 in the Reference field.
- Press Enter. Excel moves to cell J3.
Go to -- Ctrl+G
You can also use Ctrl+G to go to a specific cell.- Hold down the Ctrl key while you press "g" (Ctrl+g). The Go To dialog box opens.
- Type C4 in the Reference field.
- Press Enter. Excel moves to cell C4.
The Name Box
You can also use the Name box to go to a specific cell. Just type the cell you want to go to in the Name box and then press Enter.- Type B10 in the Name box.
- Press Enter. Excel moves to cell B10.
Select Cells
EXERCISE 3
Select Cells
To select cells A1 to E1:- Go to cell A1.
- Press the F8 key. This anchors the cursor.
- Note that "Extend Selection" appears on the Status bar in the lower-left corner of the window. You are in the Extend mode.
- Click in cell E7. Excel highlights cells A1 to E7.
- Press Esc and click anywhere on the worksheet to clear the highlighting.
Alternative Method: Select Cells by Dragging
You can also select an area by holding down the left mouse button and dragging the mouse over the area. In addition, you can select noncontiguous areas of the worksheet by doing the following:- Go to cell A1.
- Hold down the Ctrl key. You won't release it until step 9. Holding down the Ctrl key enables you to select noncontiguous areas of the worksheet.
- Press the left mouse button.
- While holding down the left mouse button, use the mouse to move from cell A1 to C5.
- Continue to hold down the Ctrl key, but release the left mouse button.
- Using the mouse, place the cursor in cell D7.
- Press the left mouse button.
- While holding down the left mouse button, move to cell F10. Release the left mouse button.
- Release the Ctrl key. Cells A1 to C5 and cells D7 to F10 are selected.
- Press Esc and click anywhere on the worksheet to remove the highlighting.
Enter Data
In this section, you will learn how to enter data into your worksheet. First, place the cursor in the cell in which you want to start entering data. Type some data, and then press Enter. If you need to delete, press the Backspace key to delete one character at a time.EXERCISE 4
Enter Data
- Place the cursor in cell A1.
- Type John Jordan. Do not press Enter at this time.
Delete Data
The Backspace key erases one character at a time.- Press the Backspace key until Jordan is erased.
- Press Enter. The name "John" appears in cell A1.
Edit a Cell
After you enter data into a cell, you can edit the data by pressing F2 while you are in the cell you wish to edit.EXERCISE 5
Edit a Cell
Change "John" to "Jones."- Move to cell A1.
- Press F2.
- Use the Backspace key to delete the "n" and the "h."
- Type nes.
- Press Enter.
Alternate Method: Editing a Cell by Using the Formula Bar
You can also edit the cell by using the Formula bar. You change "Jones" to "Joker" in the following exercise.- Move the cursor to cell A1.
- Click in the formula area of the Formula bar.
- Use the backspace key to erase the "s," "e," and "n."
- Type ker.
- Press Enter.
Alternate Method: Edit a Cell by Double-Clicking in the Cell
You can change "Joker" to "Johnson" as follows:- Move to cell A1.
- Double-click in cell A1.
- Press the End key. Your cursor is now at the end of your text.
- Use the Backspace key to erase "r," "e," and "k."
- Type hnson.
- Press Enter.
Change a Cell Entry
Typing in a cell replaces the old cell entry with the new information you type.- Move the cursor to cell A1.
- Type Cathy.
- Press Enter. The name "Cathy" replaces "Johnson."
Wrap Text
When you type text that is too long to fit in the cell, the text overlaps the next cell. If you do not want it to overlap the next cell, you can wrap the text.EXERCISE 6
Wrap Text
- Move to cell A2.
- Type Text too long to fit.
- Press Enter.
- Return to cell A2.
- Choose the Home tab.
- Click the Wrap Text button
. Excel wraps the text in the cell.
Delete a Cell Entry
To delete an entry in a cell or a group of cells, you place the cursor in the cell or select the group of cells and press Delete.EXERCISE 7
Delete a Cell Entry
- Select cells A1 to A2.
- Press the Delete key.
Save a File
This is the end of Lesson1. To save your file:- Click the Office button. A menu appears.
- Click Save. The Save As dialog box appears.
- Go to the directory in which you want to save your file.
- Type Lesson1 in the File Name field.
- Click Save. Excel saves your file.
Close Excel
Close Microsoft Excel.- Click the Office button. A menu appears.
- Click Close. Excel closes.
sumber http://www.baycongroup.com/excel2007/01_excel.htm
Jika Anda menyukai Artikel di blog ini, Silahkan
klik disini untuk berlangganan gratis via email, dengan begitu Anda akan mendapat kiriman artikel setiap ada artikel yang terbit di Blog Indahnya Berbagi


1 comments:
Terima kasih postingnya Gan, jelas banget !!!
www.brajatechnology.blogspot.com
Post a Comment